The Blueprint: Designing Professional Physical Machine Architectures
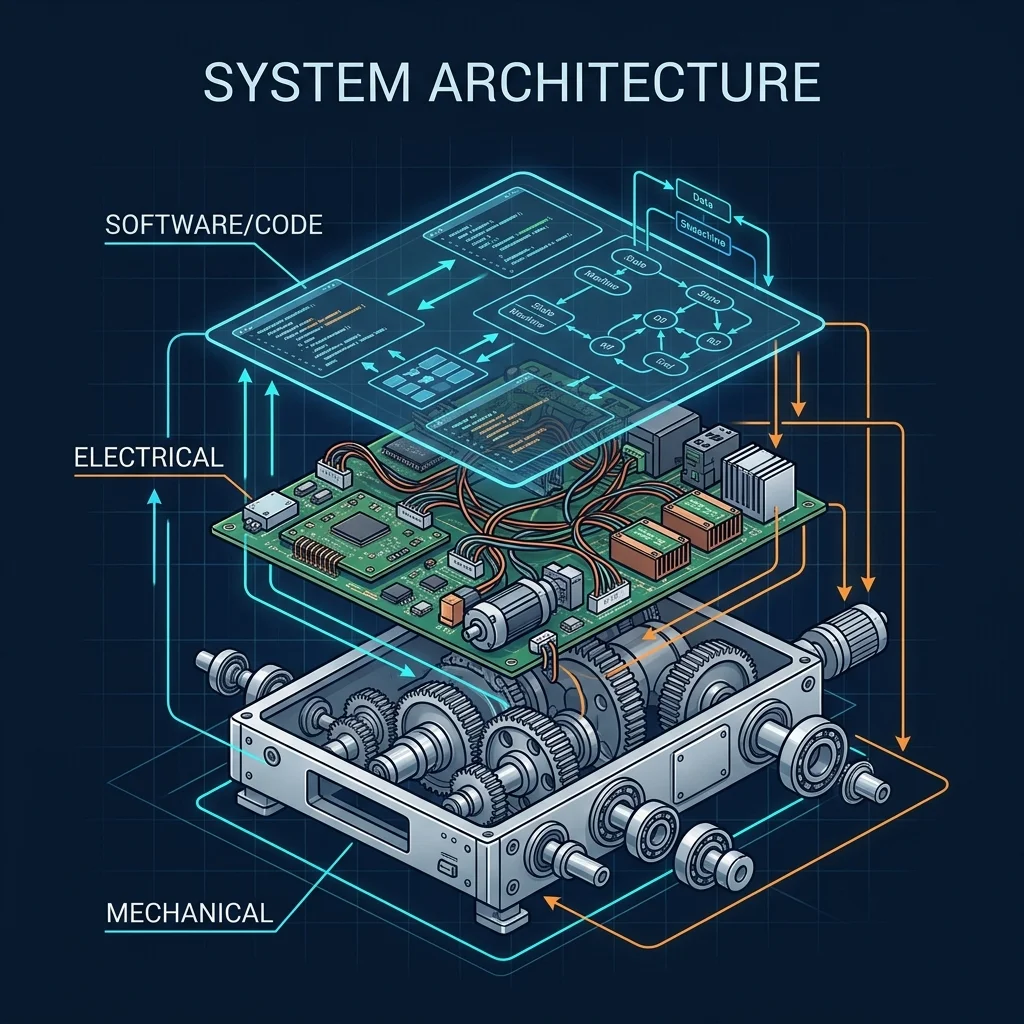
A bug in a web application throws a 500 error. A bug in a machine control system starts a fire. When you transition from writing pure software to building physical machines, you enter a realm where code meets the unforgiving constraints of the physical world. You can no longer iterate with quick deploys; every decision is etched into metal, solder, and wire.
Professional machine design is not about making things work once on a bench. It follows a rigorous engineering process called Embodiment Design, where a preferred concept is systematically broken down into a product architecture, individual component designs, material selections, and manufacturing processes. The physical outputs of this process are engineering drawings, prototypes, test data, and critically, a Failure Mode and Effects Analysis (FMEA) that maps every way the machine can fail before it ever powers on.
This is followed by Detail Design, which takes those drawings and prototypes and determines exactly how the product will be made: which components are standard catalogue items, which must be custom-manufactured, and what the full product specification looks like.
To demonstrate this process in practice, I stripped a Creality Ender 3 of its electronics and transplanted them into an old ATX computer tower, creating a "split-system" control station. This project became a case study in the five pillars of machine architecture: product architecture, signal flow, state machine logic, closed-loop control, and dependency mapping.
1. Product Architecture: The Core Triad
The first output of Embodiment Design is Product Architecture: how is the product broken down into discrete components for manufacture? In product design, this means exploring the arrangement of elements and decomposing the product into individually manufacturable sub-systems. Rushing into component-level detail before establishing this high-level architecture is one of the most common engineering mistakes.
A physical machine operates across two primary domains: Hardware and Software, with Hardware further divided into Mechanical and Electrical sub-systems. The challenge is defining the precise boundaries and interfaces where they meet. Separating these domains architecturally is crucial for parallel engineering, fault isolation, and clear interface contracts. For the Ender 3 control station, the core idea was to physically separate these domains: the "messy" electrical parts (power supply, mainboard, LCD screen) would be housed inside a custom-modded PC case, while the mechanical gantry remained unencumbered on the desk.
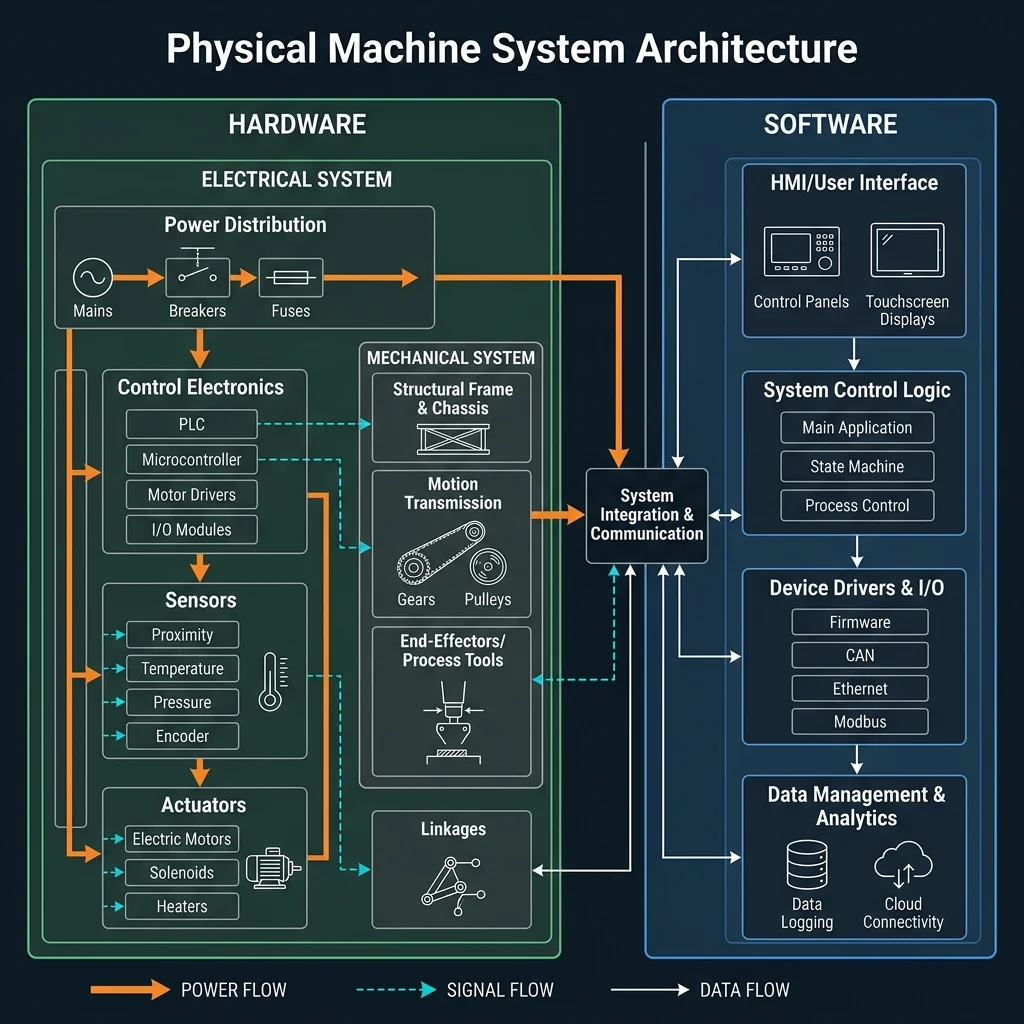
Figure 1: Physical Machine System Architecture - Hardware and Software domains connected by Power, Signal, and Data flows.
Notice the three distinct flows in the architecture above. The Power Flow (orange arrows) distributes raw electrical energy from the mains through breakers and fuses to the control electronics and actuators. The Signal Flow (teal dashed lines) represents low-voltage analog and digital signals connecting sensors to the microcontroller, and the microcontroller to the motor drivers. Finally, the Data Flow (solid white arrows) manages high-level digital communication between the system control logic, HMI, and external cloud services. Isolating these three flows physically is the single most important architectural decision; mixing high-voltage switching noise with delicate sensor signals corrupts readings and creates dangerous false positives.
- Hardware - Mechanical Domain (Structural Frame & Motion): The physical Ender 3 frame, stepper motors, belts, and lead screws. This domain dictates the physical bandwidth of the system - the maximum speed and acceleration the machine can achieve.
- Hardware - Electrical Domain (Control Electronics & Sensors): The transplanted nervous system. The stock 24V power supply was mounted inside the PC case, along with a secondary 5V buck converter for the Raspberry Pi. Brass standoffs held the printer's mainboard securely to the chassis, and all ground wires were star-grounded to the metal case for EMI shielding.
- Software Domain (System Control Logic): The brain. By moving the electronics into a spacious tower, I had room to add a Raspberry Pi for remote monitoring, real-time control loops via Klipper firmware, and custom RGB logic running on an independent microcontroller.
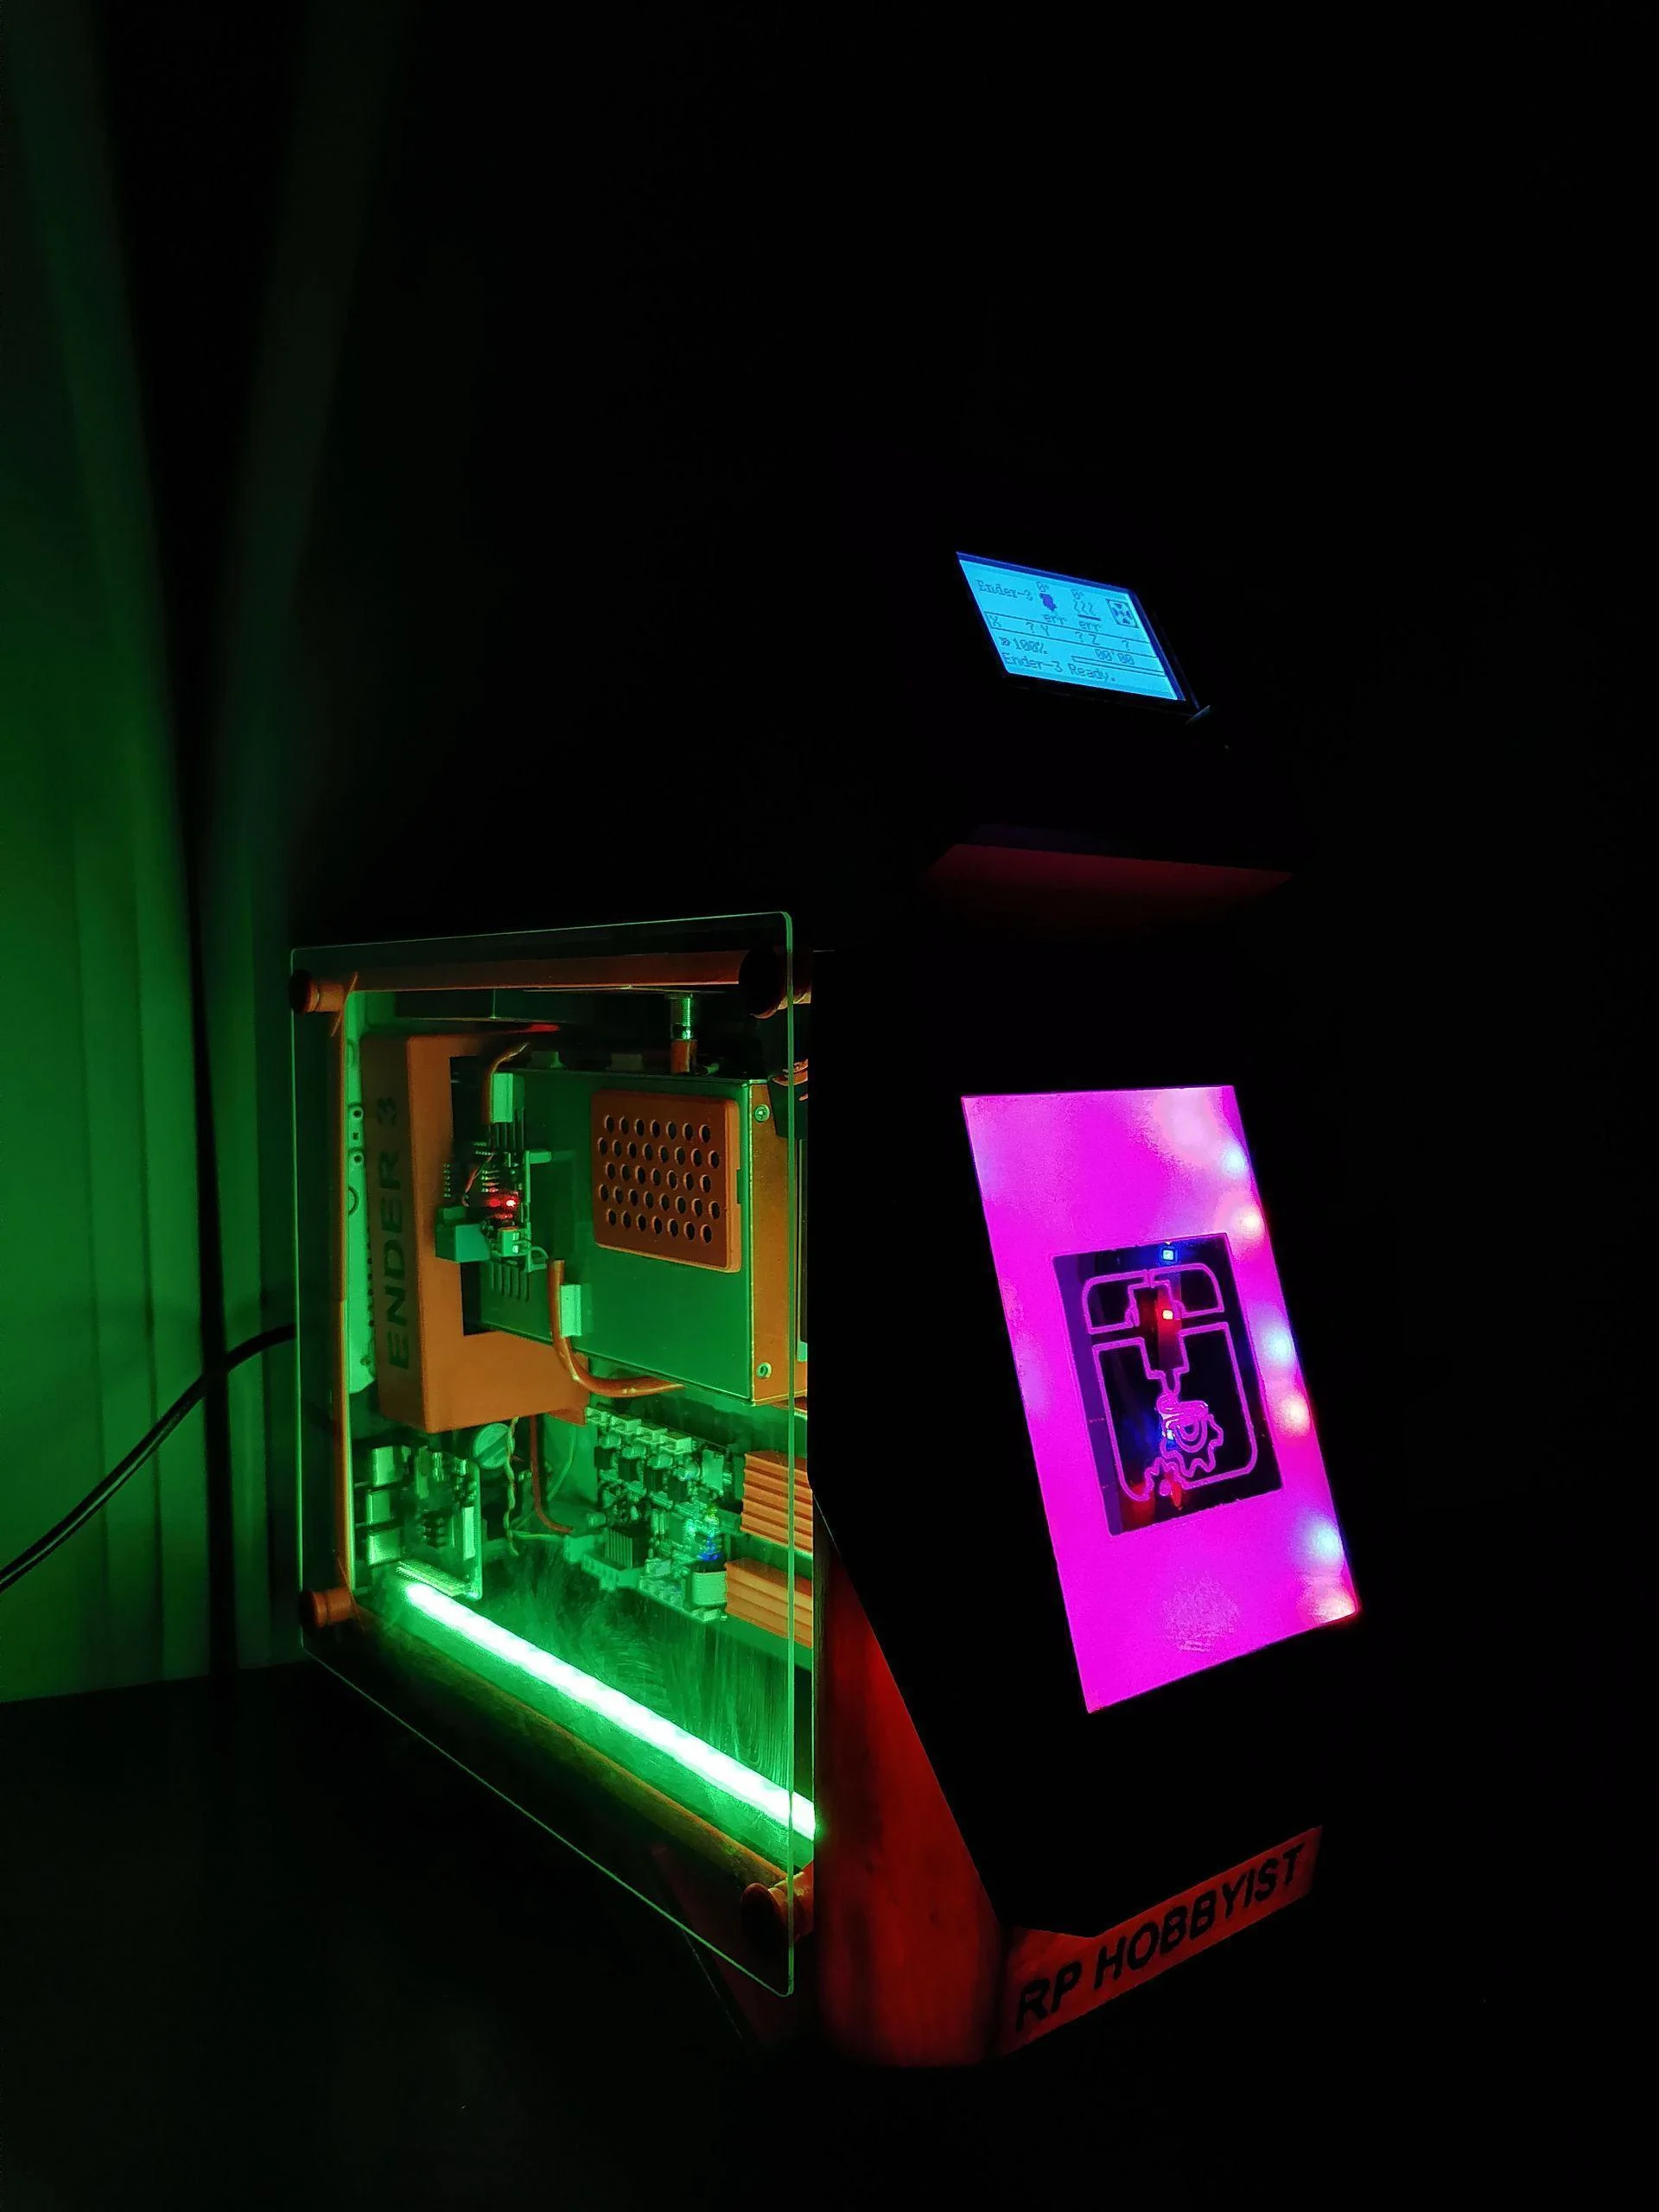
The completed Electrical Domain: Ender 3 mainboard mounted inside the ATX tower, with active RGB lighting and a dedicated LCD panel showing system status.
In embodiment design terms, each of these three domains represents a distinct component design challenge. The mechanical domain requires engineering drawings for frame modifications. The electrical domain requires a wiring schematic and bill of materials. The software domain requires a state machine specification. Each has its own materials, manufacturing process, and failure modes. The product architecture diagram above is the map that ensures these three domains integrate cleanly at their interfaces.
2. Signal Flow: Routing the Nervous System
With the product architecture established, the next step in embodiment design is component-level design: how does each subsystem actually work? The first and most critical component to design is the signal path - how physical phenomena in the real world are captured, processed, and acted upon.
When I separated the "brain box" (PC case) from the printer (mechanical frame), I had to extend cables for the steppers, limit switches, thermistor, and the hotend heater. This umbilical cord forced me to confront Signal Flow - the full chain from physical measurement to digital processing to physical actuation.
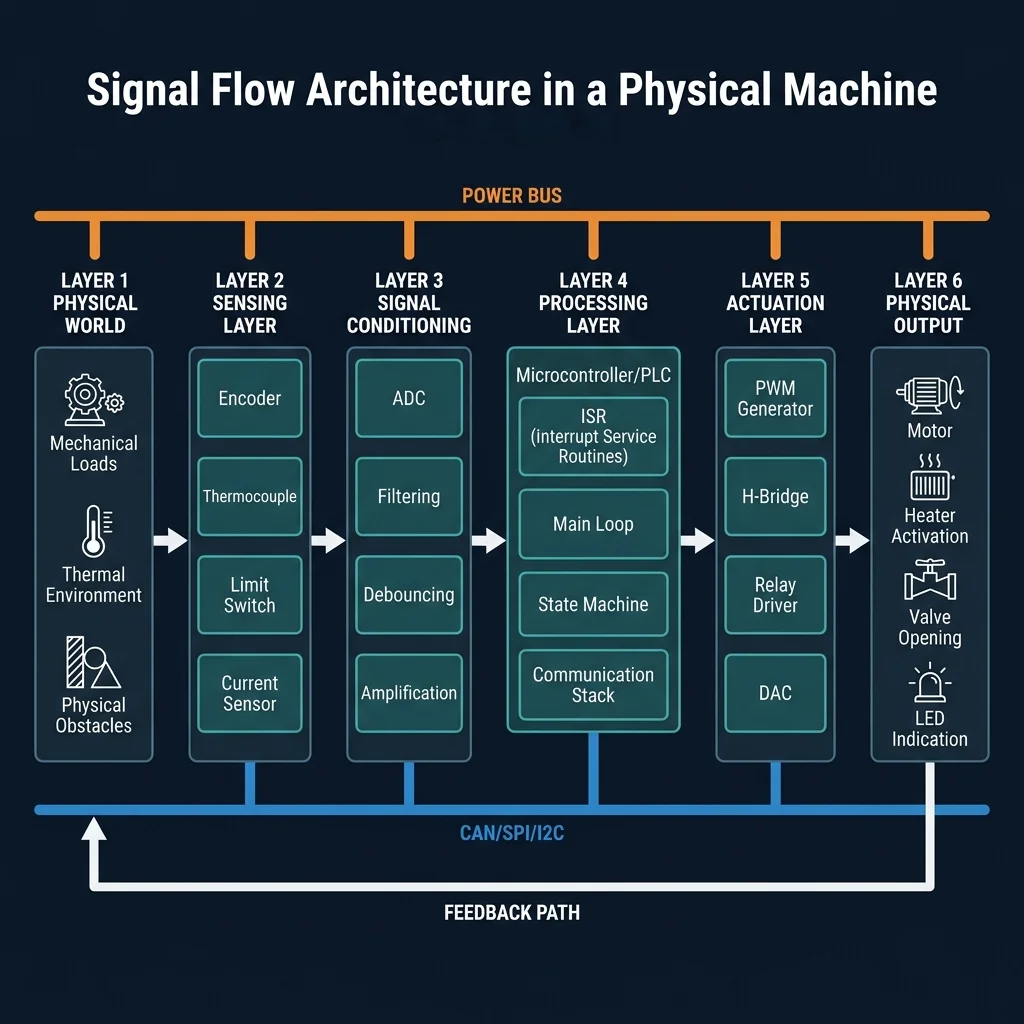
Figure 2: Signal Flow - six layers from physical input to actuation, with a feedback path via CAN/SPI/I2C.
The diagram breaks down the signal path into 6 sequential layers. Layer 1 (Physical World) represents measurable phenomena: thermal environments, mechanical loads, and physical obstacles. Layer 2 (Sensing Layer) captures these phenomena using transducers - thermocouples for temperature, encoders for position, limit switches for boundaries, and current sensors for motor load. Layer 3 (Signal Conditioning) is where raw signals are cleaned before the brain sees them: ADCs convert analog voltages to digital values, debouncing filters eliminate mechanical switch bounce, and amplification brings weak signals to readable levels. Layer 4 (Processing Layer) is the microcontroller or PLC, running Interrupt Service Routines (ISRs), a main control loop, a state machine, and communication protocols. Layer 5 (Actuation Layer) converts digital decisions back into physical power: PWM generators for proportional control, H-Bridges for bidirectional motor drive, relay drivers for on/off switching, and DACs for analog output. Finally, Layer 6 (Physical Output) is the real-world result: motors spin, heaters activate, valves open, and status LEDs indicate machine state.
Notice the Feedback Path at the bottom of the diagram. This is what separates professional machine design from hobby-level wiring: the output of Layer 6 is continuously measured by Layer 2, creating a closed loop. The communication buses (CAN, SPI, I2C) shown along the bottom provide the high-speed digital backbone that connects distributed sensors and actuators back to the central processor.
Running these extended wires through 7mm flexible PVC conduit looked professional, but routing sensitive analog sensor wires (like the 100K NTC thermistor) alongside rapidly switching, high-current stepper motor cables is a classic recipe for Electromagnetic Interference (EMI). The simplest and most effective countermeasure is Physical Separation - routing low-voltage sensor wires in a completely separate conduit from the high-current motor bundle, and ensuring any unavoidable crossings happen at 90-degree perpendicular angles rather than running parallel. This is also where Detail Design comes in - specifying the exact wire gauges to carry the required current without voltage drop, and using secure crimped ferrule connections. Furthermore, every layer draws from the shared Power Bus (shown at the top of the diagram), which is why power integrity and proper decoupling capacitors at each component are critical to keep signal integrity intact.
The physical signal flow in the Ender 3 control station follows this exact chain:
- Sensing: The thermistor converts nozzle heat into a variable analog resistance (100K ohms at 25°C, dropping to ~4K ohms at 200°C).
- Signal Conditioning: The raw analog signal passes through an RC low-pass filter (capacitors on the mainboard) before reaching the 10-bit ADC, ensuring high-frequency EMI noise from the stepper drivers doesn't corrupt the temperature reading.
- Actuation: The mainboard's firmware computes the required heater output and sends a PWM (Pulse Width Modulation) signal - rapidly switching the MOSFET gate on and off at ~7.6 Hz - to control the average thermal energy delivered to the 40W heater cartridge through the umbilical cord.
Protecting sensitive electronics from shop dust and moisture? Read the IP Rating Guide
Once a physical signal is conditioned and read by the brain, the machine must decide what to do with it. But before we can discuss how precisely the machine controls temperature or position (Control Theory), we must first define what the machine should be doing at any given moment. This is where State Machines come in.
3. The Brain: State Machines and Physical Safety
In the embodiment design process, functional principles from the concept phase must be abstracted into discrete features, then integrated into a working system. For a machine, the most critical "functional feature" is its operating logic: the set of rules that determine what the machine is allowed to do, and when. Professional machine software is built around Finite State Machines (FSMs) - deterministic models that guarantee the machine is only ever in one well-defined state at a time.
Why does this come before control theory? Because a PID loop is meaningless if the machine doesn't know whether it should be heating, moving, paused, or shut down. The FSM is the decision framework; the control loops are the execution engines that operate within each state.
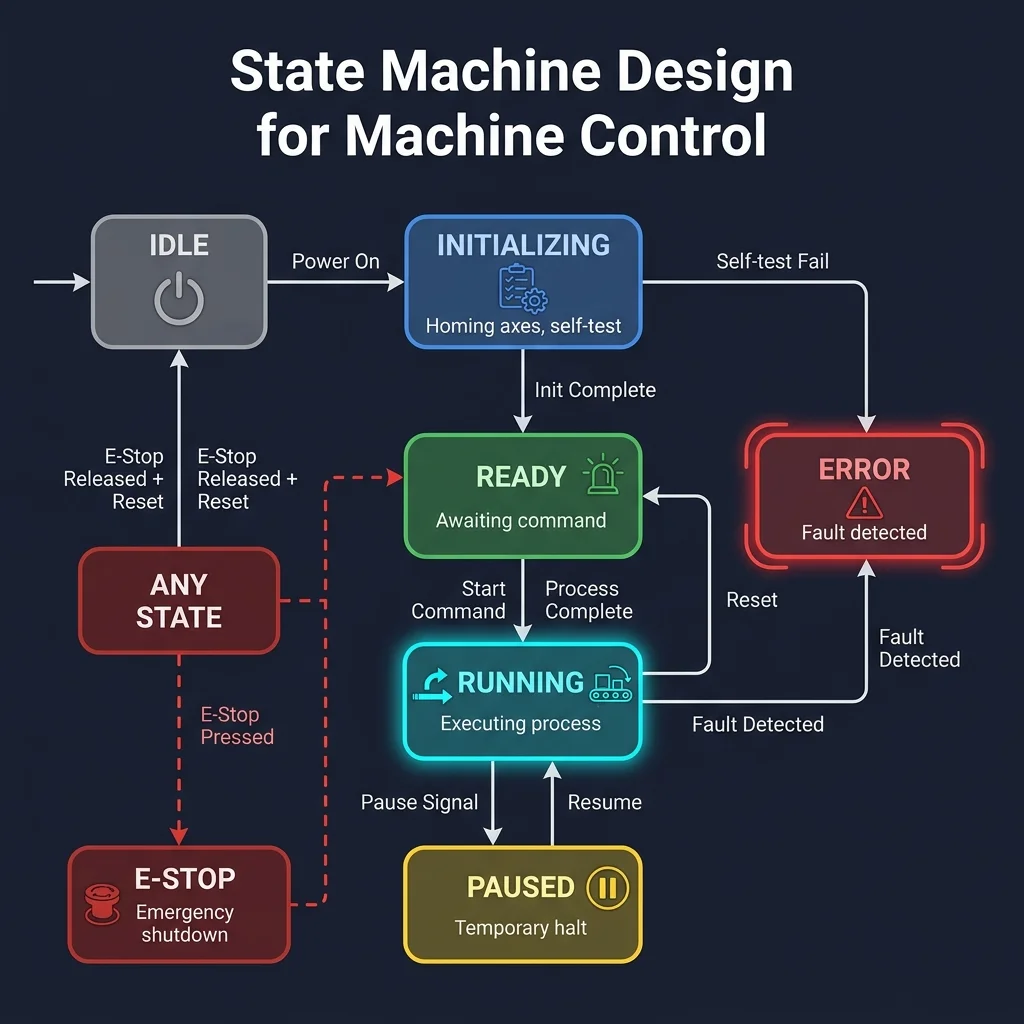
Figure 3: Machine State Machine - IDLE through RUNNING, with fault detection and hardware E-Stop override.
The diagram above maps every valid state and transition for a machine control system. Upon power-on, the machine enters IDLE. A power-on command transitions it to INITIALIZING, where it homes all axes and runs a self-test (checking that all sensors respond, all motors move freely, and all limit switches trigger). If the self-test passes, the machine moves to READY, awaiting a command. If the self-test fails, it transitions directly to the ERROR state, preventing operation. This logic is typically implemented in firmware as an interrupt-driven main loop. A start command transitions it to RUNNING, where the actual process (printing, milling, welding) executes. From RUNNING, a user can issue a Pause Signal to enter PAUSED, which halts motion but maintains heater temperatures, allowing safe resumption. Crucially, if a Fault is Detected from ANY operational state (READY, RUNNING, or PAUSED), the machine immediately falls into the ERROR state, which disables all heaters and motors. An overriding hardware E-STOP - accessible from ANY state including ERROR - triggers a hard emergency shutdown, cutting all power. Returning from E-STOP requires a deliberate physical reset.
This is directly connected to FMEA (Failure Mode and Effects Analysis) - one of the key physical outputs of embodiment design. For the Ender 3 control station, the critical failure modes include:
- Thermal Runaway: If the thermistor wire breaks (open circuit), the firmware reads 0°C and applies full heater power indefinitely. The FSM's thermal runaway protection detects when temperature doesn't rise despite full power output, or when it rises faster than physically possible, and forces an immediate transition to ERROR.
- Endstop Failure: If a limit switch fails (stuck open), the machine will drive an axis into the frame. The FSM monitors homing timeout and triggers ERROR if an endstop isn't reached within the expected travel distance.
- Communication Loss: In Klipper firmware, the Raspberry Pi is the kinematic brain. If USB communication drops, the MCU firmware has an independent watchdog that transitions directly to E-STOP within 500ms.
But software alone isn't enough; it must be backed by physical safety layers. I wired a WiFi Relay Module into the main AC power line to act as a hard network-level E-Stop - if the software FSM fails entirely, I can kill power remotely from my phone. Furthermore, the ATX metal chassis provides a star-grounded earth connection, and active 120mm fan cooling across the stepper drivers prevents thermal throttling. These independent physical safeguards operate regardless of software state.
4. Control Theory: Closing the Loop
With the FSM defining what the machine should be doing (e.g., "RUNNING: maintain nozzle at 200°C"), the next question is how precisely does it maintain that temperature? Open-loop systems assume actions execute perfectly - apply 40W and hope you reach 200°C. But real-world physics involves thermal drift, ambient temperature changes, and part cooling fans blowing cold air across the heater block. Professional machine architecture demands Closed-Loop Control.
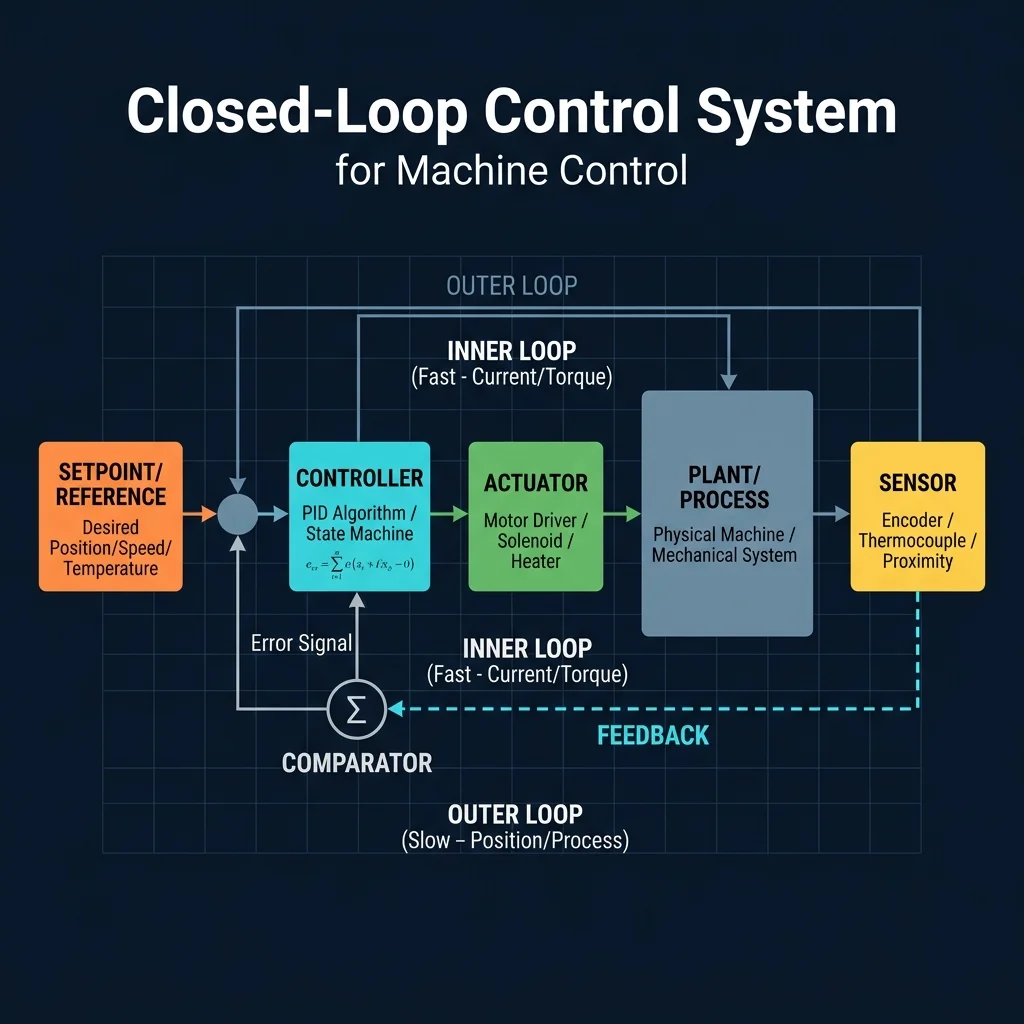
Figure 4: Closed-Loop PID Control with cascaded inner (current/torque) and outer (position/temperature) loops.
This diagram visualizes how the machine constantly self-corrects. The Setpoint/Reference (orange block) is your desired value - 200°C for the nozzle, or a specific X/Y/Z position. The Comparator (sigma symbol) subtracts the actual Sensor reading (Feedback, shown as a dashed cyan line) from the Setpoint to generate an Error Signal. The Controller (cyan block) - running a PID algorithm inside the RUNNING state of our FSM - takes this error and calculates the exact corrective effort, sending commands to the Actuator (green block: motor driver, solenoid, or heater MOSFET). The Actuator acts on the Plant/Process (grey block: the physical machine and its thermal/mechanical system), and the resulting real-world change is measured by the Sensor (yellow block: encoder, thermocouple, or proximity sensor), completing the feedback loop.
The diagram also illustrates Cascaded Control with two nested loops. The fast Inner Loop controls a high-bandwidth variable like motor current (torque) at up to 10 kHz. The slower Outer Loop controls the high-level variable like position or temperature at 1 kHz (while a 3D printer's temperature loop runs much slower at ~10 Hz, this 10 kHz/1 kHz cascade is the standard industrial servo architecture). The outer loop's output becomes the inner loop's setpoint. This separation ensures rapid disturbance rejection - when the print bed suddenly accelerates, the inner current loop compensates within microseconds, long before the outer position loop even registers the disturbance.
The mainboard uses a PID algorithm to calculate the exact heater control effort based on the error signal:

While the formula looks intimidating, the three terms map to intuitive behaviors: Proportional (Kp) reacts to the current error - if the nozzle is 20°C below target, apply proportionally more power. Integral (Ki) accumulates past error over time - this eliminates the steady-state offset that proportional-only control always leaves (e.g., the nozzle stabilizing at 198°C instead of 200°C because heat loss to the environment exactly balances the proportional output). Derivative (Kd) predicts future error by measuring the rate of change - this prevents overshoot by reducing heater power as the temperature approaches the setpoint, rather than waiting until it has already overshot. Poorly tuned gains introduce new failure modes: a high proportional gain causes aggressive oscillation, while excessive integral gain leads to integral windup and severe overshoot.
In detail design terms, tuning these three gains (Kp, Ki, Kd) is part of the product specification: specific numerical parameters that determine the machine's real-world performance. Marlin firmware provides an automatic PID autotune command (M303) that heats the nozzle through multiple oscillation cycles to empirically determine optimal gains for your specific hardware configuration.
Want to see PID control applied to battery management? See how MATLAB simulations saved my battery pack
5. Dependency Mapping: Integration and Scaling
The final stage of embodiment design is integration: combining functional and non-functional features into a cohesive system. Alternative functional forms and styling forms must be evaluated, permuted, and integrated before a final embodiment is selected. For a machine, this translates to a critical question: how do you add "smart" features (WiFi monitoring, RGB lighting, cloud logging) without compromising the safety-critical core you've carefully engineered in the previous steps?
The answer is Dependency Mapping - explicitly categorizing every subsystem by how tightly it is coupled to the machine's core operation. To build this map, list all subsystems and ask: "If this component fails, does the machine need to halt to prevent damage?" If yes, it is tightly coupled.
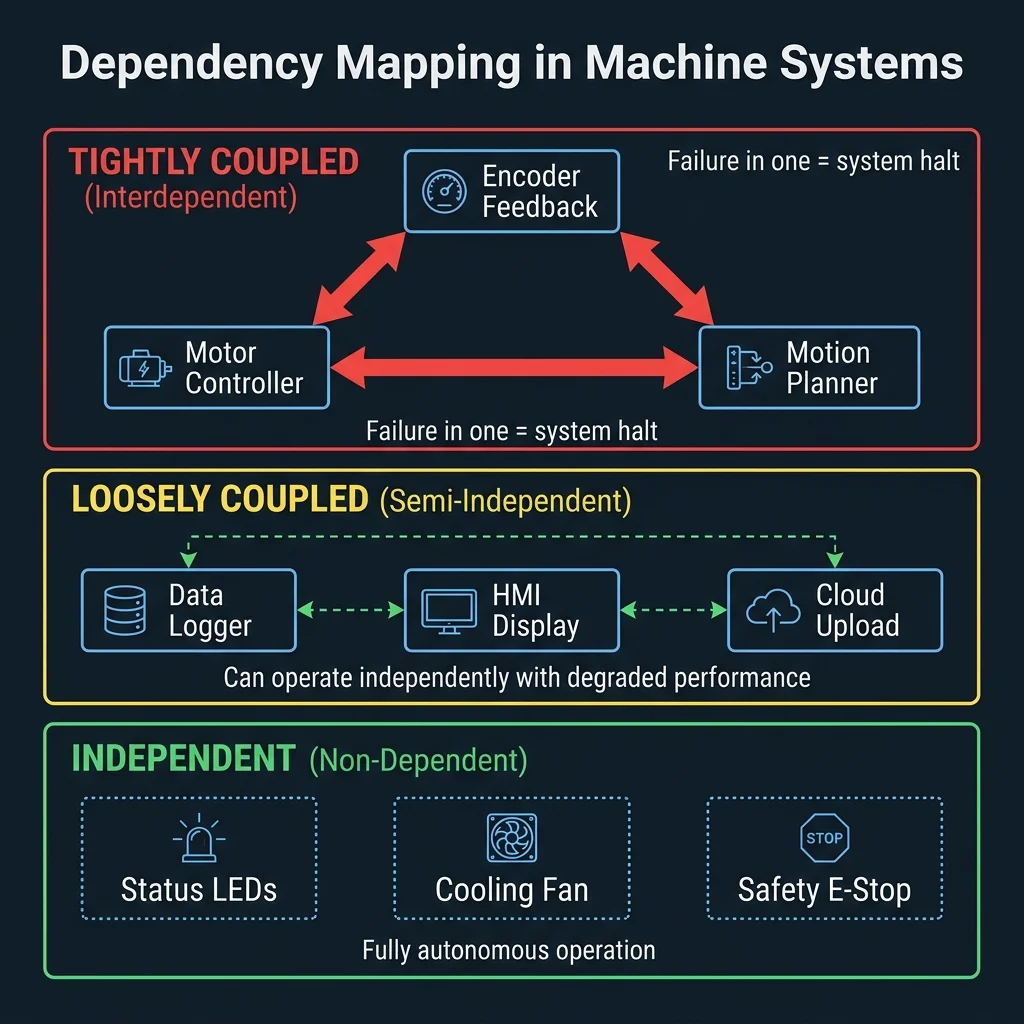
Figure 5: Dependency Mapping - three coupling tiers from safety-critical (red) to fully autonomous (green).
The diagram above categorizes machine subsystems into three tiers of coupling. Tightly Coupled (Red Zone) systems are interdependent - the Motor Controller, Motion Planner, and Encoder Feedback form a triangle where a failure in any one node immediately halts the entire system to prevent a crash. These are the components identified in your FMEA as safety-critical. Loosely Coupled (Yellow Zone) systems like Data Loggers, HMI Displays, and Cloud Upload can operate independently with degraded performance; if the cloud connection drops mid-print, the machine continues running - you just lose remote monitoring. Independent (Green Zone) systems like Status LEDs and Cooling Fans operate autonomously. The hardware E-Stop is also in this zone because it is independently powered and always active, bypassing software entirely; a failed RGB LED will never corrupt a 24-hour print.
For the Ender 3 control station, this dependency mapping directly informed the wiring architecture:
- Tightly Coupled: The limit switches and stepper drivers share the same power domain and communication bus. If the Z-endstop fails, the Z-motor must halt immediately. In Klipper firmware, the Raspberry Pi is also tightly coupled - it actively computes the machine's kinematics in real-time. If the Pi crashes, the entire printer halts within 500ms via the MCU watchdog. This is fundamentally different from OctoPrint, where the Pi is loosely coupled (it merely streams G-Code over USB, and a WiFi dropout doesn't stop the print).
- Loosely Coupled: The OctoPrint web interface and any temperature logging. Useful for monitoring, but the machine operates identically without them.
- Independent: The RGB LED strip runs on a separate 5V rail from an independent buck converter, controlled by its own microcontroller. The ATX case cooling fans are wired directly to the 12V PSU rail. Neither system shares any data or power path with the core printer electronics.
This is the difference between a fragile prototype and a professional machine: every "nice-to-have" feature is explicitly designed to fail silently, without cascading into the safety-critical core.
Conclusion
The final result is a clean, "split-system" machine: the printer frame sits light and unencumbered on the desk, while the heavy electronics are safely enclosed in a dust-free, actively cooled, star-grounded ATX tower.
But more importantly, this project demonstrates the professional design process that separates engineering from tinkering. Embodiment design forced us to decompose the machine into a clear product architecture (Mechanical, Electrical, Software domains), design each component with proper signal flow, and conduct an FMEA before the system was powered on. Detail design then specified the exact PID tuning parameters, wire gauges, connector types, and manufacturing steps needed to build a repeatable, reliable machine.
Whether you are building a 3D printer control station, a CNC router, or an industrial automation cabinet, the blueprint is the same: define your architecture, route your signals cleanly, establish safe operating states with an FSM, tune your control loops to the hardware, and integrate new features only through explicit dependency mapping. That is how you elevate a fragile prototype into an industrial-grade system.
Disclaimer: This article discusses general principles of physical machine system architecture, control theory, and electrical engineering. The architectures and parameters described are for educational purposes. Actual implementations must adhere to local safety regulations, IEC/UL standards, and specific equipment ratings. Always consult qualified engineering professionals before building industrial automation systems.
Frequently Asked Questions
What is Embodiment Design and why does it matter for machine architecture?
Embodiment Design is the engineering phase where a preferred concept is broken down into a product architecture, component designs, material selections, and manufacturing processes. For machine architecture, it forces you to systematically decompose the system into domains (mechanical, electrical, software), design their interfaces, and conduct a Failure Mode and Effects Analysis (FMEA) before building anything. Skipping this step is how prototypes become fragile and unreliable.
Why use an old PC case for a 3D printer control station?
ATX PC cases provide excellent integrated airflow with standardized 120mm fan mounts, pre-drilled ATX mounting standoffs for securing electronics, and a grounded metal enclosure that acts as an EMI shield. The star-grounded chassis eliminates ground loops that would otherwise corrupt sensor readings. They are safer, better cooled, and more modular than custom 3D-printed electronic enclosures.
How do I prevent electrical noise from motors affecting my sensors?
The most effective method is Physical Routing. Never run low-voltage sensor wires (like thermistors) in the same conduit as high-current stepper motor cables. Keep them separated by physical distance and use shielded cable or separate conduits. If wires must cross, ensure they cross at a 90-degree perpendicular angle rather than running parallel, which minimizes electromagnetic coupling.
Why should State Machine design come before PID tuning?
A PID loop is an execution engine - it controls how precisely a variable is maintained. But it is meaningless without a State Machine that defines what the machine should be doing. The FSM determines whether the machine should be heating, moving, paused, or in emergency shutdown. You must define the operating rules and safety transitions before you tune the control loops that execute within each state.
What tools do you need to build a machine control station inside a PC case?
Essential tools include a soldering iron with temperature control, heat shrink tubing for insulation, wire crimpers for JST and ferrule connectors, and a multimeter to verify voltages and continuity. You will also need a drill and step-bit set for mounting custom standoffs inside the metal chassis, and cable management supplies (PVC conduit, zip ties, and cable labels) for clean wiring runs.