Quit Prompt Engineering: How I Built an Autonomous AI Engineering Team Using Agentic Workflows

I wasted hundreds of hours chatting with my AI like it was a technical manual. Then I figured out how to actually make it design hardware for me.
What does "orchestrating" mean in a hardware context? Simple. You set up your design rules, BOM preferences, and mechanical constraints once, and the AI just follows them. Every PCB. Every enclosure. You stop repeating your design standards.
Inside This Master Guide
| Section | What It Covers | Read Time |
|---|---|---|
| The Architecture | The 4-layer system map for Hardware | 1 min |
| Layer 1: Context | How to end AI amnesia on your tech stack | 2 min |
| Layer 2: Memory | How to make AI remember your BOM preferences | 2 min |
| Layer 3: Skills | How to automate PCB audits and DFM checks | 3 min |
| How I Train Custom Skills | My 3-step loop for hardware workflows | 3 min |
| Layer 4: Agents | Splitting work: Mechanical vs. Electrical agents | 2 min |
| The Full Methodology | How all 4 layers build a physical product | 2 min |
About 15 minutes total. Worth bookmarking for your next build.
Why I Stopped "Prompt Engineering"
I'll be honest. I used to spend way too long crafting the "perfect prompt" to get a simple component selection. Re-explaining my PCB design rules for the fifth time that week. Copy-pasting footprint data from old chats because the AI forgot which package size I prefer for resistors.
It was exhausting. And for a hardware engineer, it was a massive waste of time.
Prompt engineering was the 2023 thing. We're past that now.
| What I used to do | What I do now |
|---|---|
| Type PCB design rules from scratch every time | AI reads my CONTEXT.md automatically |
| Re-explain enclosure constraints every session | AI remembers my DFM corrections permanently |
| Copy-paste the same long BOM prompts | Fire a 1-click reusable Hardware Skill |
| Hope one AI can handle the whole machine | Run a pipeline of specialist engineering agents |
Two open-source projects changed everything for me: - Superpowers - an agentic skills framework with 190k+ stars on GitHub. It's a full hardware/software development methodology. - skills.sh - an open directory of 90,000+ AI agent skills you can install and use immediately.
If those terms don't mean much yet, don't worry. I'll explain everything below with real examples from my own hardware projects.
The Economics of Orchestration: Saving 80% on Token Waste
If you're wondering how adding more files (like Context and Skills) actually saves tokens, it comes down to how AI chat interfaces fundamentally work. It's something I didn't realize until I looked under the hood.
When you use a normal chat window, the AI has no actual memory. To keep the conversation going, the interface secretly re-sends your entire conversation history every single time you hit enter. By turn 10 of debugging a schematic, you're paying to re-send thousands of tokens of old, useless chit-chat just to ask it to change a resistor value. I call this "Quadratic Token Bloat."
Agentic workflows don't do this. They rely on state instead of chat history. When my Electrical Agent finishes picking components, it writes the BOM to a file, clears its brain, and shuts down. When the Mechanical Agent wakes up, it reads only the final BOM and my core CONTEXT.md. It drops the thousands of tokens of intermediate reasoning.
Plus, modern AI APIs support Context Caching—meaning I pay pennies to keep my core design rules loaded on the server, rather than paying full price to paste them into a prompt every day.
| Metric | Manual Prompting (Chat UI) | Agentic Orchestration |
|---|---|---|
| Context Overhead | ~1,500+ tokens (re-sent every turn) | ~200 tokens (cached & auto-loaded) |
| Correction Loops | Bloats history quadratically | Fixed permanently in Skills |
| Total Waste | 80-90% (Redundant data) | <10% (High signal only) |
By treating your AI as a team of specialists rather than a generic chat bot, you eliminate the "kitchen sink" problem where every message includes every rule. You only pay for the intelligence you're actually using.
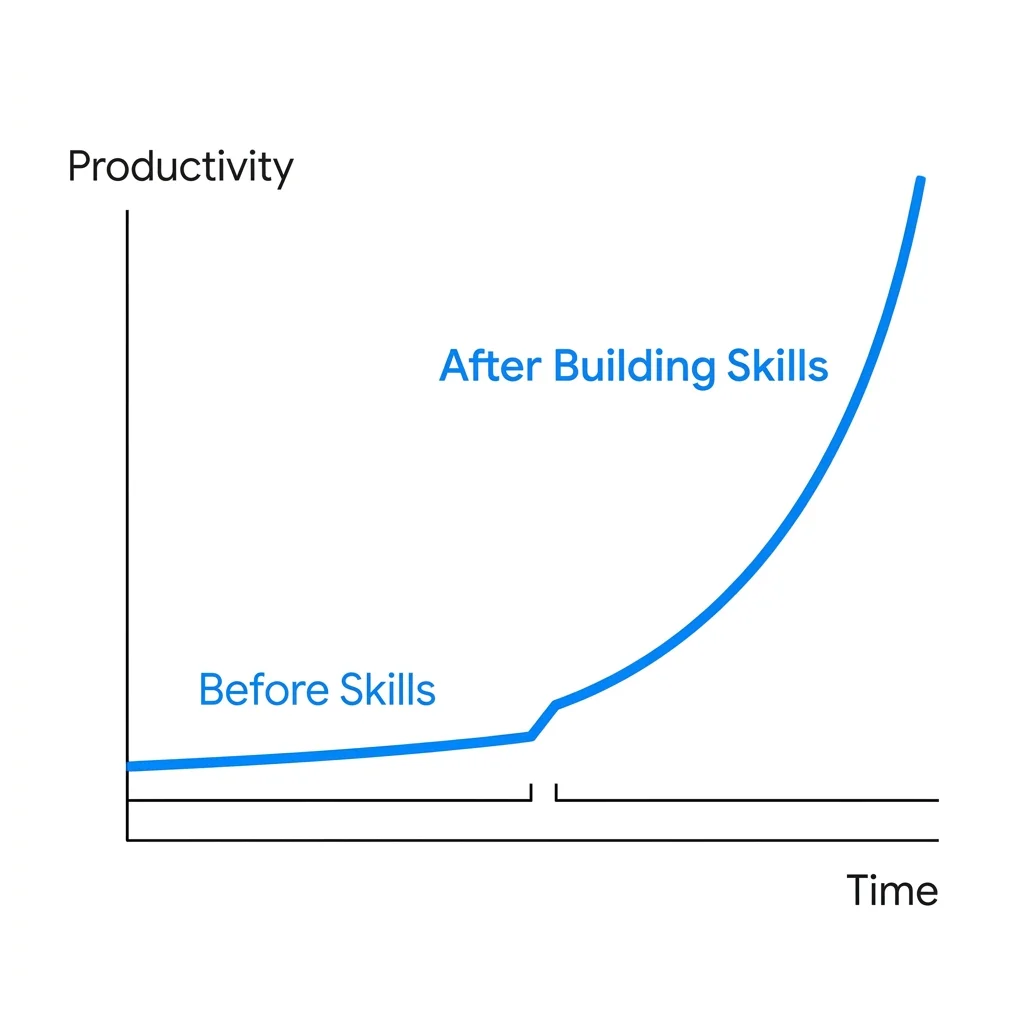
My productivity before and after building custom AI skills
The Architecture: My 4-Layer Setup
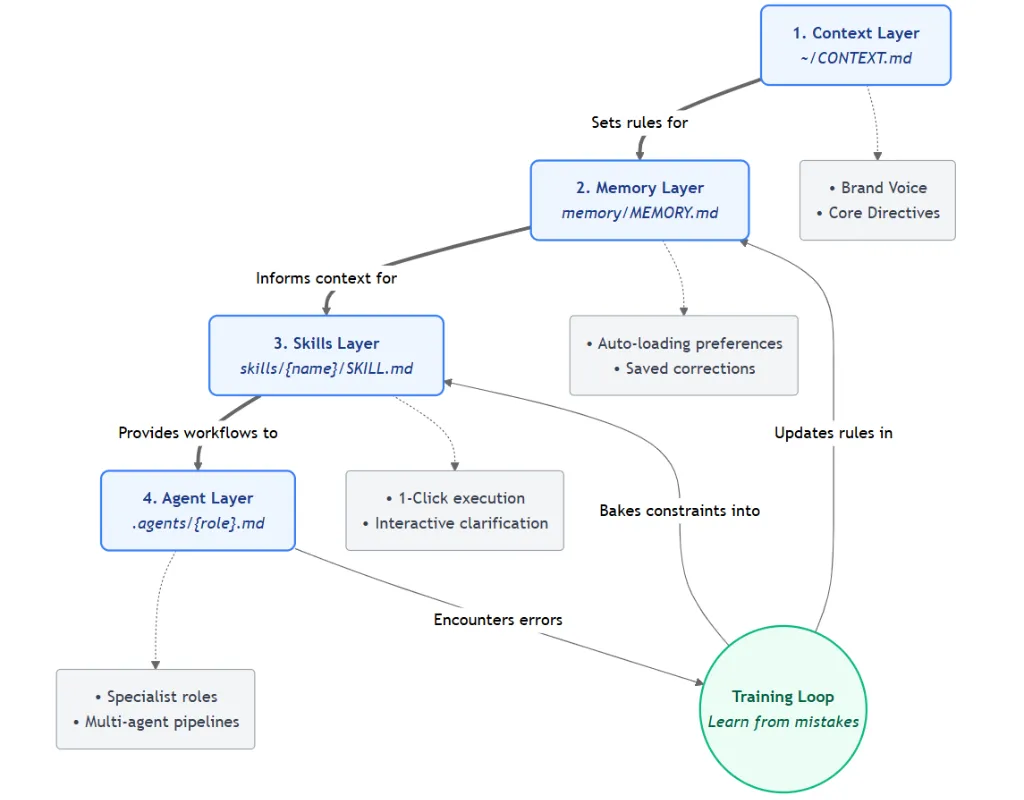
The 4-Layer Autonomous AI Architecture: Context, Memory, Skills, and Agents
Here's the big picture. I built this 4-layer system around the Superpowers framework and the skills.sh ecosystem. Think of it as my personal operating system for AI agents.
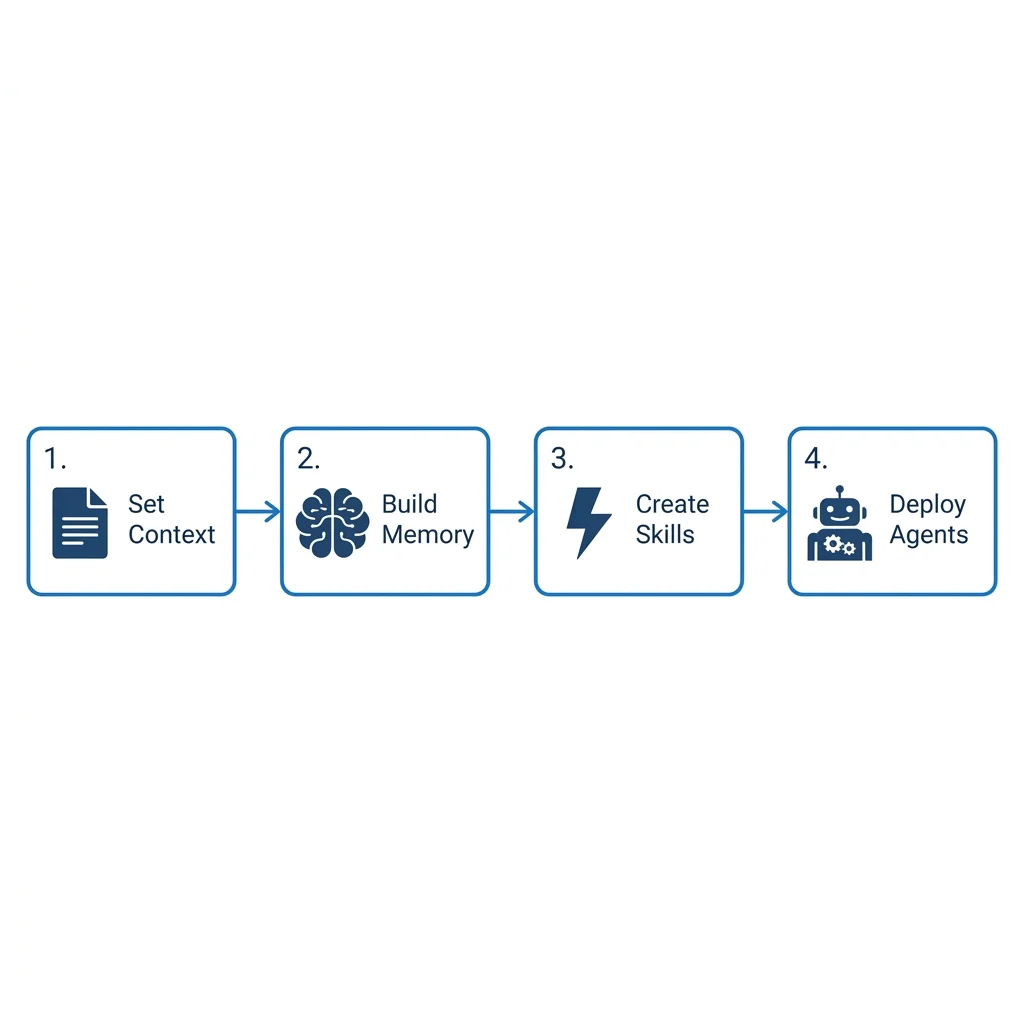
The 4 steps: Set Context, Build Memory, Create Skills, Deploy Agents
Data flows top-down through four layers. When something goes wrong (and it will), the Training Loop feeds corrections back up so the same mistake doesn't happen twice.
Let me walk through each layer.
Layer 1: Context (~/CONTEXT.md)
You know what's annoying? Opening a new chat and having the AI act like you've never met. Every. Single. Time.
"What's your MCU choice?" "What PCB design standards do you follow?" "Should I use 0402 or 0603 footprints?"
I got tired of answering the same questions. So now I keep a CONTEXT.md file in the root of every project. (Different tools call this different things - CLAUDE.md, .cursorrules, etc. I use CONTEXT.md to keep it tool-agnostic.) When I start a session, the AI agent picks it up automatically and reads it before doing anything. No copy-pasting. It just works.
Inside that file, I put: - My design rules ("use 4-layer stackup for any high-speed signal, stop and audit if routing fails") - Quality standards ("IPC-2221 Class 2, 6mil minimum trace width") - Project scope (Schematics in KiCad, Enclosure in Fusion 360)
And here's the thing that really matters: when my AI gets a design constraint wrong, I don't just correct it in the chat and move on. I go update the CONTEXT.md. That way, the correction becomes permanent. Not a throwaway message that disappears tomorrow.
Layer 2: Memory (memory/MEMORY.md)
Context is what I write upfront. Things I know I care about before the work starts.
But Memory is different. Memory is all the stuff I didn't know I cared about until it came up.
"Actually, I want all decoupling caps to be 0.1uF X7R." "Don't use that LDO regulator, the lead time is 52 weeks." "Always put the mounting holes at these exact coordinates, not near the power jack."
These kinds of micro-preferences pop up constantly while working. Without Memory, they vanish the moment the session ends. Next time, you're correcting the same thing again.
So I force the AI to save each correction as its own .md file:
| Memory File | What It Stores |
|---|---|
pcb-patterns.md |
Via sizes, clearance rules, stackup preferences |
bom-guidelines.md |
Preferred vendors (LCSC, Mouser), substitute parts |
mechanical-notes.md |
Tolerance rules, standard fastener sizes, DFM tips |
These files auto-load in every new session. So session 50 is wildly more efficient than session 1, because it has 50 sessions worth of accumulated hardware engineering corrections baked in.
Layer 3: Skills (skills/{name}/SKILL.md)
Some tasks I do every single week. Auditing a BOM. Running DFM checks. Writing firmware drivers. Designing test jigs.
For months, I was typing out the same massive prompt each time. Or worse, trying to remember what I typed last time and failing. Honestly, I probably had 5 different versions of my "run a PCB audit" prompt scattered across old chat histories.
That's when I found Skills.
A Skill is basically a reusable workflow packaged as a SKILL.md file. You walk through a process once, the AI structures it, and from then on you fire it with a single command. There's a whole ecosystem of these at skills.sh.
The hardware-relevant skills I use almost daily (from obra/superpowers):
| Skill | What It Does |
|---|---|
🧪 /hardware-testing |
Forces SPEC → SIMULATE → PROTOTYPE. No shortcuts. |
📋 /writing-plans |
Breaks hardware work into bite-sized tasks |
🔍 /systematic-debugging |
Oscilloscope-grade root cause analysis for board failures |
✅ /dfm-audit |
Proves the design is manufacturable before ordering PCB |
🌿 /using-git-worktrees |
Isolates firmware/CAD versions on a clean branch |
Installing them is straightforward. The exact command depends on your AI tool:
npx skills add obra/superpowers

/plugin install superpowers@claude-plugins-official

/add-plugin superpowers
Check the official repo for your specific setup.
But honestly, the pre-built stuff is just the starting point. The real game-changer is making your own.
How I Actually Make and Train Custom Skills
OK, this is the part I'm most excited to share, because it's where I save the most time.
Pre-built skills cover generic engineering tasks. But my hardware development workflow? My BOM validation pipeline? The way I handle DVT (Design Validation Testing)? No public skill is going to know that stuff. I had to build those myself.
It's simpler than it sounds. Here's my 3-step process:
Step 1: Give it a reference document
I already had my hardware development guidelines written down in a doc. So I just pointed the AI at it:
"Make a new skill using the principles in this document:
/docs/hardware_guidelines.md. It has my DFM rules, BOM quality gates, and PCB review criteria."
I type that straight into my AI chat. It reads the file from my local project, pulls out the process, and generates a structured SKILL.md file. Took maybe 2 minutes.
Step 2: Make it ask questions before doing anything
This was a game-changer. I don't want the AI guessing what I need. I want it to ask me first.
So inside the skill, I add this rule:
"When this skill is triggered, MUST first ask the user specific questions to simplify the task and get absolute clarity before doing any work."
Now every time I trigger the skill, it asks me things like "What's the target PCB size?", "Which sensors are critical?", "What's the power budget?" before designing a single trace. That alone eliminated maybe 80% of the rework I was dealing with.
Step 3: Learn from mistakes (the training loop)
This is the part most people skip. And it's the entire reason my skills keep getting better.
Here's what happens in practice:
- I trigger the skill. The AI does its thing.
- It makes a mistake. Maybe it picked a component with 1.27mm pitch when I can only solder 2.54mm. Maybe it missed a critical pull-up resistor on the I2C bus. Whatever.
- Instead of just fixing it in the chat and moving on, I open the
SKILL.mdfile and add the mistake as a new rule.
Before:
## Execution Rules
- Break the board into subsystems
- Run DRC after every block
After:
## Execution Rules
- Break the board into subsystems
- Run DRC after every block
- NEVER assume component availability - always ask the user to confirm BOM lead times
- ALWAYS check for I2C pull-up resistors before finalizing the schematic
That's it. Five minutes to document the mistake. And now the skill never makes that error again. Ever.
After about 10-15 rounds of this, my Hardware Development skill runs almost flawlessly. It's been battle-tested against every weird edge case I've run into.
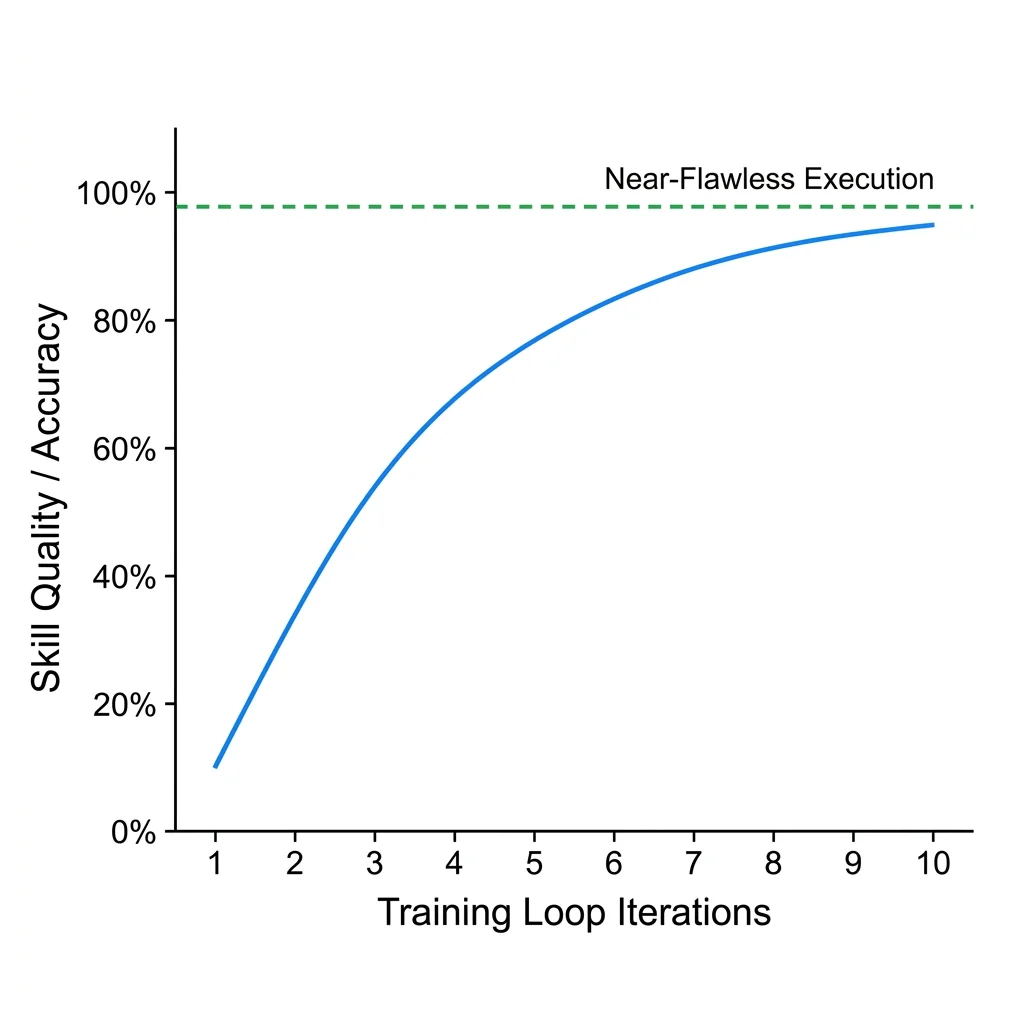
Skill quality improves with each training loop iteration
I invest 5 minutes documenting a mistake, and I save hours across every future run. That math works out really fast.
Keep It Organized (Seriously)
One thing I learned the hard way: if you don't organize your files from day one, you'll lose track of everything within a week. You'll have skills scattered across random folders, memory files you forgot existed, and no idea which CONTEXT.md belongs to which project.
Let me show you what this looks like in practice. Say I'm building a Smart Sensor Node. Here's how I organize my project root:
smart-sensor-node/
├── CONTEXT.md                       # "We use STM32 + KiCad, IP65 enclosure,
│                                    #  low power design, IPC-2221 Class 2"
├── memory/
│   ├── MEMORY.md                    # Main memory index
│   ├── pcb-patterns.md              # "Always use 0.1uF decoupling caps, star grounding"
│   ├── bom-guidelines.md            # "Preferred LCSC parts, keep BOM under $15"
│   └── mechanical-notes.md          # "Mount enclosure holes at 40x40mm centers"
├── skills/
│   ├── new-schematic-block/
│   │   └── SKILL.md                 # Step-by-step: requirement → component → netlist
│   ├── bom-validation/
│   │   └── SKILL.md                 # Check availability, pricing, footprints
│   ├── pcb-layout-audit/
│   │   └── SKILL.md                 # Routing check → thermal analysis → Gerber check
│   └── firmware-release/
│       └── SKILL.md                 # Version bump → build binary → HW validation
└── .agents/
    ├── electrical.md                # Designs schematics and validates signal integrity
    ├── mechanical.md                # Manages enclosure design and DFM constraints
    └── firmware.md                  # Writes the embedded C code and drivers
Every skill maps to something I actually do during the hardware development cycle. Need to add a new sensor block? There's a skill for that. Validating a BOM? Skill. Prepping a firmware release? Skill.
When I need to update a skill, I know exactly where it is. When I want to reuse these workflows on my next product, I just copy the skills/ folder. When the AI does something unexpected, I check the memory files first - usually the answer is right there in pcb-patterns.md or bom-guidelines.md.
It sounds basic, but staying organized like this has saved me more time than any individual skill. You can't improve what you can't find.
How I Wire Skills Together So the Right One Always Fires
Having 20 skills in a folder is useless if you have to manually remember which one to use for each task. I tried that. It's just a different kind of copy-paste problem.
The trick is in the description field at the top of every SKILL.md. This is the part most people skip or write lazily, and it's the most important line in the entire file.
Here's what the top of one of my skills looks like:
---
name: hardware-development
description: Use when building new hardware products, planning BOMs, breaking down
  electrical requirements, or creating design specs. Also use when the
  user says "design this", "new PCB", "hardware spec", or "break this down."
---
That description is what the AI reads to decide which skill to pull up. When I type "design the new sensor board," the AI already has all my skill descriptions loaded, spots the match, and fires it automatically.
So I write my descriptions like search queries. I stuff them with every phrase I might realistically say when I need that skill:
| Skill | Trigger Phrases in Description |
|---|---|
new-schematic-block |
"design this", "new block", "add a sensor", "new circuit" |
bom-validation |
"check BOM", "validate components", "find parts for", "BOM review" |
pcb-layout-audit |
"DRC check", "layout review", "signal integrity", "optimize PCB" |
systematic-debugging |
"board is dead", "short circuit", "not booting", "sensor noise" |
firmware-release |
"build binary", "flash board", "version bump", "release firmware" |
The more specific your trigger phrases, the more reliably the right skill fires. I update these phrases whenever I notice the AI picking the wrong skill, same training loop idea.
You can also chain skills. My hardware-development skill has a line at the bottom:
## Related Skills
- After schematic is approved, trigger `writing-plans` to break layout into tasks
- For debugging hardware prototypes, use `systematic-debugging`
The AI reads those hints and knows what to reach for next. I don't have to tell it. It just flows from one skill to the next as the work evolves.
Layer 4: Agents (.agents/{role}.md)
Even with skills, I noticed that one AI trying to do everything - electrical design, mechanical fitment, firmware, and testing - just produces OK results. Not great. OK.
So I split the work into a pipeline of specialists. Each agent has exactly one job. I describe what I need in plain English, and the system wires up the right prompt and model for it.
My hardware pipeline:
Electrical ➡️ Mechanical ➡️ Firmware ➡️ QA
| Agent | What It Does | Focus Area |
|---|---|---|
| Electrical | Designs schematics and PCB layouts | Signal Integrity, EMI |
| Mechanical | Manages enclosure fitment and DFM | Tolerances, Thermal |
| Firmware | Writes embedded C/C++ drivers | Hardware Abstraction |
No human in the middle. Each agent's output feeds automatically into the next. I configure this once and it runs end-to-end. I only review the final Gerber files or binary, not every intermediate trace.
What a Real Session Looks Like
When all four layers are running together, a typical hardware dev session goes like this:
| Step | What Happens | Layer |
|---|---|---|
| 1. I describe the module | Agent reads my CONTEXT.md and asks for voltage and current requirements | Context + Skills |
| 2. It drafts a block diagram | Shows me the subsystem map I can actually verify | Skills (brainstorming) |
| 3. I say "looks good" | It creates an isolated CAD workspace on a new branch | Skills (git-worktrees) |
| 4. It writes an implementation plan | Bite-sized tasks: Schematic → Footprints → BOM Validation → Layout | Skills (writing-plans) |
| 5. It dispatches subagents | Electrical agent picks components, Mechanical agent checks fit | Agents |
| 6. It verifies everything | Runs DRC, validates BOM availability, proves DFM compliance | Skills (verification) |
| 7. It asks me to review | Final Gerber review, BOM export, or keep refining | Skills (finishing-branch) |
The AI works autonomously for hours without drifting from the electrical specs. That's not an exaggeration. Hours.
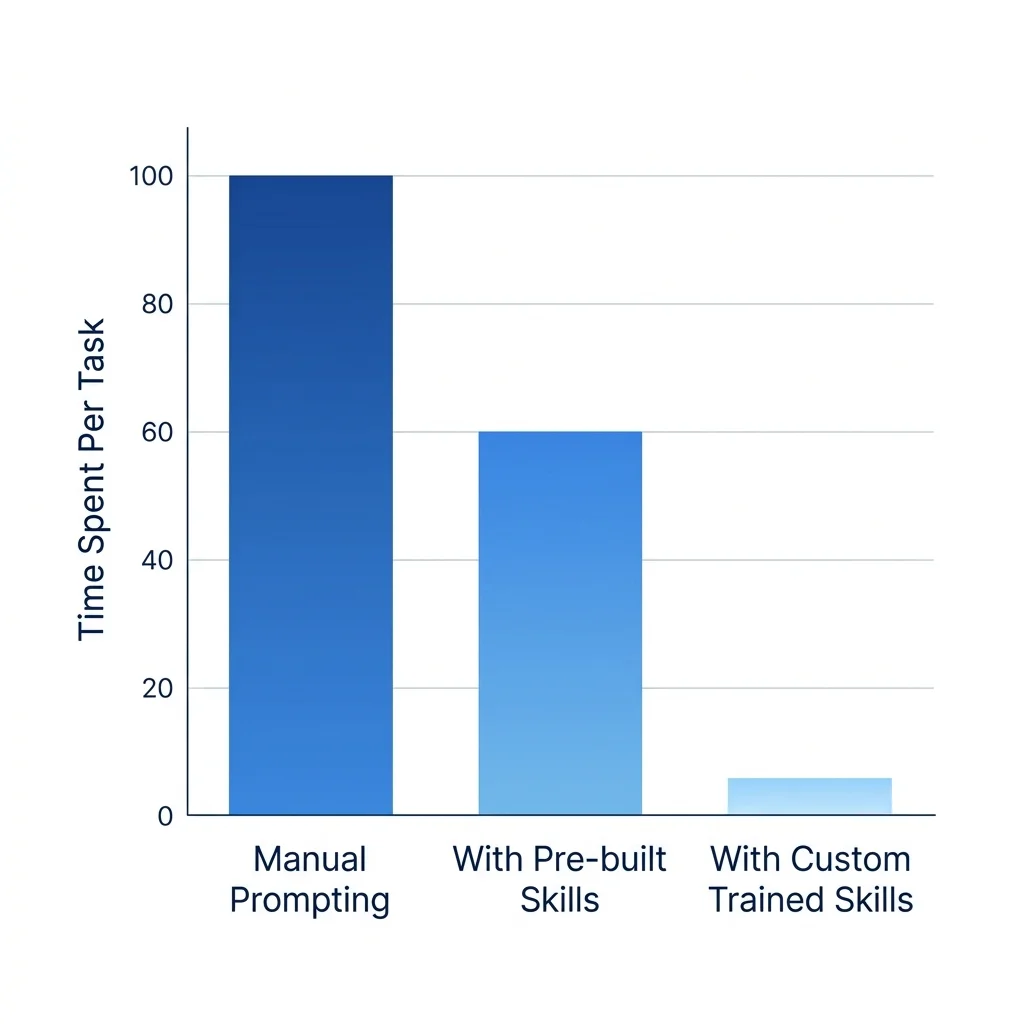
Time spent per task drops dramatically with hardware-specific custom-trained skills
Getting Started
If you want to try this for your next hardware project, here's what I'd do:
The Execution Environment: You cannot do this in a standard ChatGPT web browser window. You need an AI agent that has local file-system access. You can use an AI IDE (like Antigravity or Cursor) or a CLI agent (like Cline or Aider).
- Install Superpowers - run
npx skills add obra/superpowersand you get the engineering logic immediately. - Create a
CONTEXT.md- write down your 5 most important PCB design rules and drop the file in your project root. - Build one custom skill - pick the hardware task you do most often (like BOM validation). Point the AI at your design guidelines.
- Run it. Let it fail. Fix the skill. After 3-5 rounds of the training loop, it'll already be noticeably better at picking the right parts.
Stop chatting. Start orchestrating your hardware.
Stop Prompting. Start Orchestrating.
If this was useful, share it with someone who's still manually checking BOMs every day. Join 90,000+ engineers building autonomous hardware workflows.
Frequently Asked Questions
Can AI actually design a PCB?
AI can't physically route traces in KiCad yet, but it can select components, design schematics via netlists, validate BOMs against vendor availability, and run DFM audits on your layout. It handles the high-level engineering logic so you can focus on the physical implementation.
What are hardware agent skills?
Skills are reusable instruction files that teach your AI how to perform hardware-specific tasks like BOM validation or DRC review. Instead of re-explaining your PCB rules every time, you package them once as a SKILL.md file.
Does this work with KiCad or Altium?
Yes. Since CAD files (like KiCad schematics) are text-based, the AI can read and modify them directly. For binary files, the AI manages the process logic, checklists, and metadata surrounding the design.
What is the biggest risk with hardware AI agents?
Component mis-selection. If an agent picks a part that's out of stock or has the wrong footprint, the whole batch could be ruined. That's why multi-agent review and the training loop are critical for hardware.
How do I know if the AI's component selection is accurate?
Agentic workflows rely on multi-step verification. The initial electrical agent selects the component, but the Verification Skill cross-references the footprint and queries vendor APIs (like LCSC or Mouser) to confirm stock and pricing before finalizing the BOM. It's essentially an automated design review.